Tutorial: Beadwoven Leaf on Wire – Type
1: Veined
For a printable Microsoft Word document, click here. For a PDF, click here.
Materials and Tools:
12” 28g or 30g wire, or bead
weaving thread (wire allows better molding and holding of shapes)
Approximately 80 seed beads
size #6 in margin and vein color
Approximately 25 round beads
4mm in fill color
Chain-nose pliers
Flush cutters
|
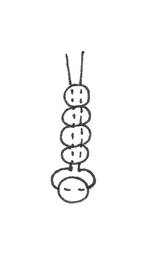
Figure 1 |
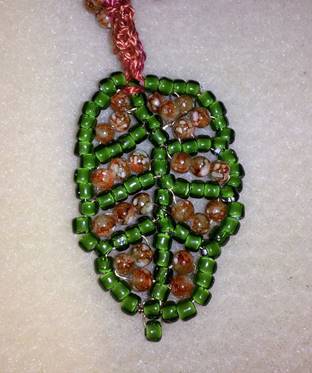
Step 1: Refer to the picture above. Place a seed bead in the center of your
wire, lined up so the wire goes through it horizontally. Fold the wire around it so it looks like
the bottom bead in Figure 1. Then
slide four more seed beads onto both ends of the wire. Bend the left piece of wire at a 45 degree
angle and slide three seed beads onto it, the last one horizontally like in
Figure 1. Bring the wire back out
through the other three beads, then place another seed bead on both wires. You are building the veins of the leaf from
the bottom up. |
Figure 2 |
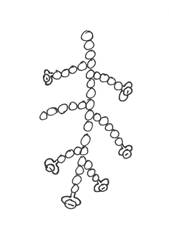
Note that
throughout the project, you will want to keep the wires pulled tightly enough
so they show as little as possible, but do not pull so tight that the wire
breaks. Also, be careful not to kink the
wire, as this will weaken it, possibly causing it to break. To accomplish this, wrap/fold the wire before
pulling it. The diagrams show the wire
loose only so you can see its path through the beads.
|
Step 2: This part is based very much on your specific leaf
as you have built it Step 1. It helps
to lay the vein structure on your table and drop fill beads into the spaces
to get an idea of the layout for this next step. For the leaf shown, this is what
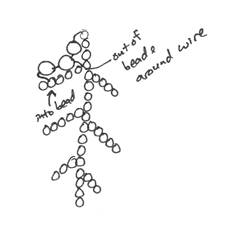
worked: Take the left wire and slide
three round 4mm beads onto it, not too tightly. Press it down into the vein structure and
thread the wire into the nearest vein bead, pushing it through until it comes
out near the center round bead, which is not yet anchored well. You can thread the wire into that center
round bead and back into another nearby vein bead to anchor the round bead
and come back out another vein bead near where the next grouping of beads
should start, or if you don’t mind seeing the wire a little bit, or if it is
too difficult to get the wire into the beads, you can thread the wire around
wires in the veins, between the #6 beads, to anchor the round beads (see
Figure 3). In the sample project, a
mixture of both techniques is used as needed.
Continue from group to group of beads, preferably moving
counter-clockwise until you come out at the top of the bead with your
wire. You will now have the veins and
filling of your leaf. |
Figure 3 |
|
|
Figure 4 |
Step 3: Take the right wire and slide several seed
beads onto it, as many as are needed to reach the first vein bead that is
sitting horizontally. Thread the wire
through that horizontal bead and keep going, adding beads until you reach
each vein, knitting the leaf together on the outside. When you get to the bottom vein bead, you
may want to put a point on your bead, as in the picture. To do this, add another seed bead
horizontally to the bottom seed bead, threading the wire through it, then
through the previous bead again (Figure 4) and pull tightly. Continue up the other side until you reach
the top of the leaf. |
|

Step 4: Wrap the wires together tightly at the top. You now have a leaf with a stem of fine wire,
which you can use to attach it to whatever you’re making. If you do not want the wires at the top, wrap
them tightly close to the oval bead, then pull each to one side and thread it
through a few seed beads before cutting it off with a flush cutter. This will hide the ends and make them less
likely to unravel or to stick you when you wear your piece.
We hope this tutorial is
helpful to you. Please leave feedback! info[at]stonepylon.com