Evolution of a Bead-woven Butterfly
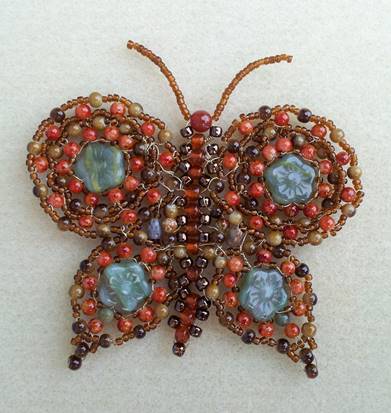
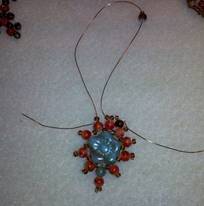
Figure 1 – Completed Piece
For a printable Microsoft
Word document, click
here. For a PDF, click
here.
Now that you have been
introduced to the techniques, here is the evolution of a butterfly. Watch the pictures closely as she emerges. The completed project with the materials
specified measures about 3 3/4” across.
|
|
Materials and Tools: 7-8 ft of 28g or 30g wire or bead weaving thread
(wire allows better molding and holding of shapes) 4 12mm flower beads 2 4mm rounds in color similar to flower beads above
(green in picture) Approximately 120 4mm rounds in contrasting color
(red in picture), plus more for filling next to body Approximately 124 4mm rounds in another color (brown
in picture), plus more for filling next to body Approximately 250 #11 seed beads, more if stiffness
dictates (brown in picture) 25 #6 seed beads in a darker outlining color (these
outline the body – metallic dark brown in picture) 11 5mm glass beads in color contrasting #6 beads
above (red-orange in the picture – these form the center of the body) 1 6mm round bead for the
head Chain-nose pliers Flush cutters Note: the project pictured
above used another 6 4mm rounds of a color between the brown and red ones, as
well as two ovals 4mm x 6mm. |
|
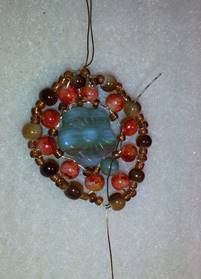
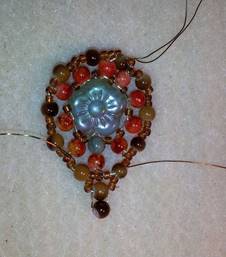
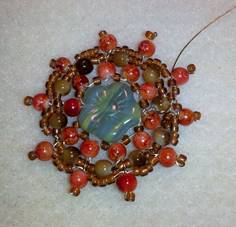
Figure 2 - starting pieces laid out |
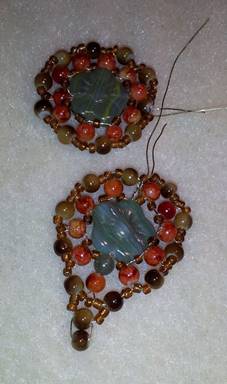
This project started out with
two similar pieces, done in the style of the Beadwoven Leaf
Type 2. The central bead in each
is a 12mm glass flower with five petals, so that determined the number and
placement of 4mm rounds. There is one
round at the tip of each petal, and one in each dip between petals. The piece laid out at the top of Figure 2
differs from the one on the bottom only in that it has no extra beads at the
tip making a point. The first part of
the progression will follow the making of a second piece like the bottom one. The fully round one as shown is the same,
except there is no extra 4mm round at the bottom of the base row, and no extra
tip piece.
Note that in
this and similar projects, it is good to use wire pieces no longer than 12”
because the wire will be weakened by being pulled through the beads so often,
and the longer the wire is, the harder it is to work with and the more likely
it is to kink. Kinks lead to breaks very
quickly, so avoid them when possible, and use your pliers to gently unbend and
straighten them. Do not straighten the
wire by pulling it through the pliers! Just
turn it as straight as you can and squeeze it in the pliers to flatten it. Never pull very tightly, as this will break
the wire. You will quickly get a feel
for working with the wire by doing a few small projects.
Here we go. The first steps are very similar to the Beadwoven Leaf Type 2. Start with a 12” piece of wire, slide on a
seed bead, a 4mm round of contrasting color, then the flower bead. Take the wire back through all but the seed
bead. Manipulate it just a bit so it
lies horizontally on the wire. See Beadwoven Leaf Type 2 for
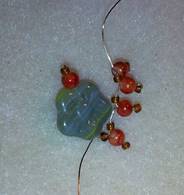
a diagram. As in those tutorials, put on
the first five 4mm rounds, separated by #11 seed beads, one seed at each tip
and one between rounds (Figure 3). Leave
just a little play in the wire so you can manipulate the beads later.
Bring the wire back up
through the center bead, take the longest piece of wire coming out the top and
start around the other side, working in the same way, but making sure to put an
extra 4mm round of similar color to the center bead next to it before sliding
on the outline color, if you are making the elongated, not the circular
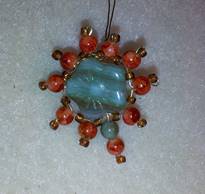
piece. Bring the wire back through the
center bead so both wires are coming out the top. Twist them together to form a stem about 1/8”
long. Push the beads into place, laying
them flat against the central bead (Figure 4).
|
|
|
|
Figure 3 |
Figure 4 |
To work the next row, slide
on a 4mm round of contrasting color, then a seed bead. Take the wire through the first seed bead at the
tip of a red 4mm round, then thread one seed, one 4mm round, and one seed
(Figure 5). Continue until the circle is
complete, ending with a single seed bead and twisting the wires together
(Figure 6).
|
|
|
|
Figure 5 |
Figure 6 |

Note that when working with
small seed beads like these #11s, you don’t need to manipulate the ones at the
tips of the rounds too much or too perfectly – leave just a bit of play so that
when working the next row, you can then turn them enough to thread the wire
through them. Too much twisting and
turning will break the wire. The
threading process will turn them the rest of the way.
Now you will make the extra
part at the bottom of this elongated piece.
Take a fresh piece of wire, 6” long, and attach it next to a 4mm round
just left or right of the center. Wind
it around the outline wire about five times (Figure 7), then thread it through
the 4mm round in the direction of the center of the piece and pull it tight so
the loop disappears.
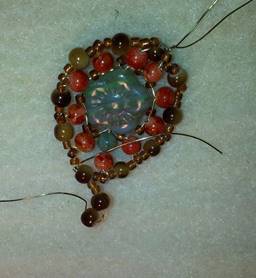
Slide two seed beads, then
two 4mm rounds onto the wire (Figure 8).
Take the wire through the first round as shown and pull tight, then
wiggle the 4mm rounds so one is right under the other (Figure 9).
|
|
|
|
|
Figure 7 |
Figure 8 |
Figure 9 |

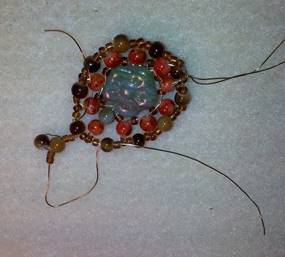
Add two more seeds, then take
the wire through the next 4mm round on the piece (Figure 10) and pull to close
the loop (Figure 11). Wrap the wire around
about 5 times and take it through the next seed bead (Figure 12) and pull tight
before cutting it off flush.
|
|
|
|
|
Figure 10 |
Figure 11 |
Figure 12 |
|
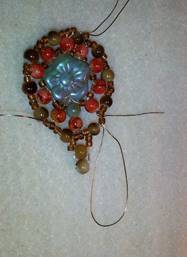
Now take the other end of
the wire through the nearest seed bead and cut it off flush (Figure 13). You have completed the
first piece! Make another one, just like
it, then two round ones that don’t have the extra 4mm rounds and the extra
beaded pieces on the bottoms. See the
top piece in Figure 2 for reference.
You need two of each shape to make your butterfly. |
|
|
|
Figure 13 – elongated piece |
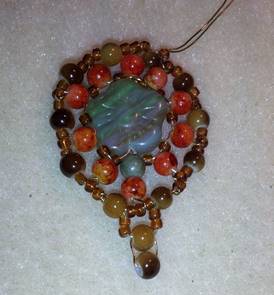
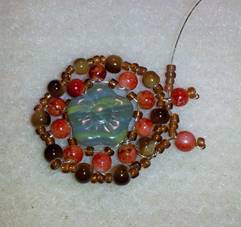
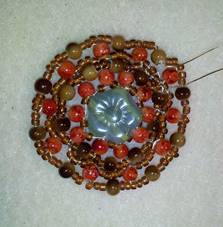
Lay out your four pieces and
decide on the angles you would like to place them at for your completed
butterfly. After doing this with our
project, it was decided that the round pieces needed to be larger. Here is how to do it.
Take a fresh 12” piece of
wire and tie it into a round piece the same way as in Figure 7, threading the
short end through a bead or two, then cutting it off. Pass the long end through a 4mm [brown] round
so it comes out the top. Slide two seed
beads onto it, then a 4mm round and a seed, and back through the round. This works the same way as in Figures 3 and
4, but you need to anchor this new circle to the ones before it. To do this, pass the wire around the beaded
wire below, then around the base of the 4mm round you just put on. Then
continue around the piece as before, anchoring under each new 4mm round (Figure
15) and ending with two seed beads. Once
the circle is complete, anchor the wire well, and pass it through the next 4mm
round. Then slide on a 4mm [brown]
round. This bead will sit vertically,
while all the rest on this circle will be horizontal. That’s ok – it will not be noticeable because
it is round. Slide on two seed beads,
pass the wire through the next seed at the tip of a 4mm [red] round and add two
more seed beads before sliding on another 4mm [brown] round. Refer to Figures 6
and 16. You will end with two seed
beads. Anchor your wire and pass it
through a couple more beads before cutting it off flush. Your round piece is now complete! Now make another one so you have two.
|
|
|
|
|
Figure 14 |
Figure 15 |
Figure 16 |
To finish your butterfly, you
need to make a body for it and attach the wing pieces. You have some decisions to make here. If you want your piece to lie flat, continue
as shown below. If you want more
dimension, you can adapt your weaving to make that happen. It is recommended you try a flat piece first,
as then you will understand how to make a dimensional piece.
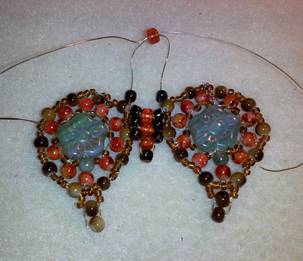
Lay out your pieces to see
where you want to attach them. Take a
fresh 12” piece of wire and place a #6 seed bead in the middle, then a
[red-orange] glass bead. Pass the other
end of the wire through the glass bead in the other direction so the wires
cross inside the bead (see Figure 17).
This is the bottom of the body.
Slide a #6 bead onto each
wire, then a 5mm glass bead on one side, and pass the wire from the other side
through it as you did in the last step.
Repeat once more. Now it’s time
to start attaching an elongated piece. Before
sliding the fourth 5mm glass bead on one side of the wire, count four 4mm
[brown] rounds from the point, and pass the wire through that round, then out
and around the base of the round so the wire is at the same level as it was
when coming out of the latest #6 seed bead. Do the same on the other side,
attaching the second elongated piece.
Then slide a glass bead from both sides as before. Look closely at Figure 17 to see how that
path was followed. Pull the wires
tight. Now you need to fill in a bit
between the body and the elongated piece in order to get the right angle. To do this, after sliding on a #6 seed bead,
add an extra 4mm [brown or another color] round, then skip a 4mm round on the
wing and pass the wire through the next #11 seed bead (Figure 18).
|
|
|
|
Figure 17 |
Figure 18 |

Repeat on the other side and pull
the wires tight before adding a [red-orange] glass bead and passing the wires
through from both sides (Figures 19 and 20).
|
|
|
|
Figure 19 |
Figure 20 |


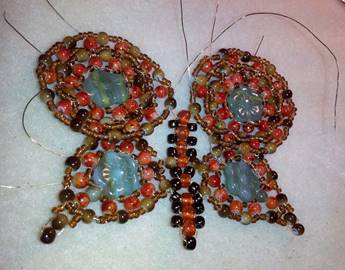
When you pull the wires
tight, the bottom wings will be attached in two places and at an angle. Continue building the body with #6 seed beads
and [red-orange] glass beads for three rows.
Then, after attaching a [red-orange] glass bead, pass the wire on each
side into a 4mm [brown] round on a top wing (Figure 21). Continue building the body for another row,
then attach the wings again by passing the wires through one or two #11 seed
beads on the wings and continuing with the body again until you get to the
top. At this point, you can go back down
the body, passing the wires through #6 seed beads, to the area where there is empty
space between the body and the wings.
Start adding 4mm round beads in any color to this area by going through
a #6 bead, then a 4mm round, then the next #6 bead, leaving a smaller space
(Figure 22).
|
|
|
|
Figure 21 |
Figure 22 |

Continue weaving the wire
through a bead or two, then back into the empty space, sliding on a 4mm round,
and possibly an oval bead, plus any #11 seed beads necessary to reasonably fill
the space. Anchor your wires, pass them
through some beads, and cut them off flush.
Now you are ready to finish
the head. Take a fresh 12” piece of wire
and pass it through the top [red-orange] glass bead on the body so that bead is
in the center of the wire. Slide a #6
seed bead onto each end of wire, then a [red-orange] glass bead onto one end
and pass the other end through it so the wires cross in the middle of the
bead, just as you have been doing while
building the body already. Slide another
#6 seed bead onto each wire, then a 6mm round for the head, crossing the wires
inside it as well. You will now have a
wire coming out each side of the head.
For the antennae, slide 19 #11 seed beads onto one wire, passing it back
through all but the last bead to anchor them, and ending by passing the wire
back through the head bead. Repeat on
the other side. Pass each wire through
the nearest #6 seed bead and anchor it under that bead. Then pass the wires into the next
[red-orange] glass bead below, crossing them inside. Cut the wires flush as they come out of this
bead (Figure 23).
Congratulations – your
butterfly is complete!
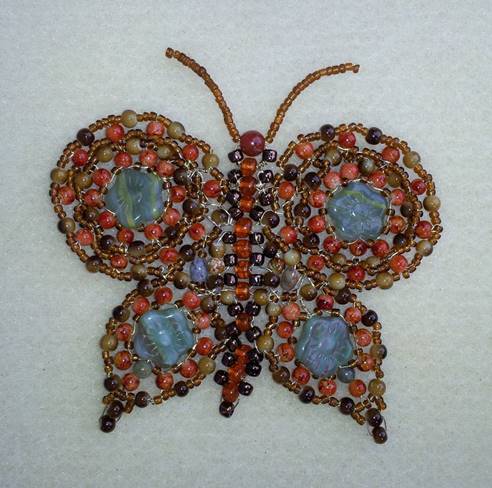
Figure 23
Now that you have made a flat
butterfly, you have the techniques and principles you need to make a more
three-dimensional one. You might try
using larger, rounder beads for the body, as well as attaching the wings to
lift up from the flat plane, and possibly overlap them a bit as well, top wings
over bottom. The antennae can also be
manipulated to sit any way you like them, and you can even curl them at the
ends if you want to. Try curling the
ends around something round, like round-nose pliers or a skinny pencil. This will shorten the antennae, so you might
want to use more beads to make them longer if you plan to curl them.
We hope this tutorial is
helpful to you. It is a complicated
piece, but we tried to be as clear as possible.
Please leave feedback and let us know how we can improve. info[at]stonepylon.com