Embroidery, Beading & Crochet
Updated 9-21-14
|
|
Here are some tutorials for making the components
below – click the pictures or the words to download PDF files:
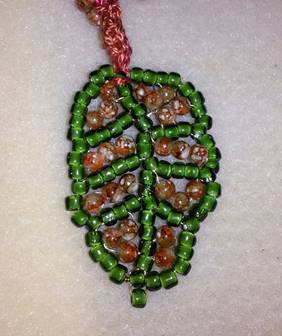
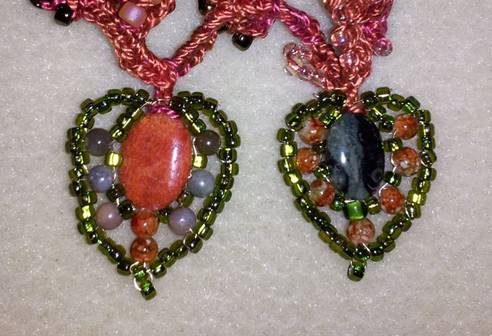
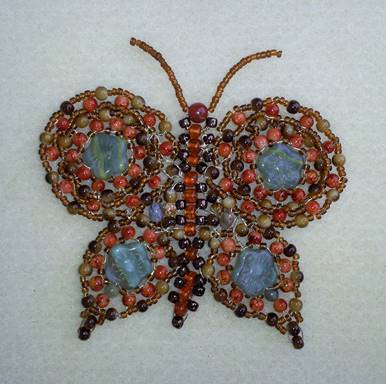
Evolution
of a Bead-woven Butterfly – html page This one
is – advanced – do the others first! If you have done any bead
weaving before, you will recognize the principles, but these tutorials will
help you move from circles and straight lines to the next level, creating
basically anything you like once you get the hang of it. They can be done on Fireline
or similar bead weaving thread, but I like 28g or 30g wire for its ability to
mold and hold a shape. Pieces made
with thread can be a bit floppy. Then
again, for some projects, that may be best.
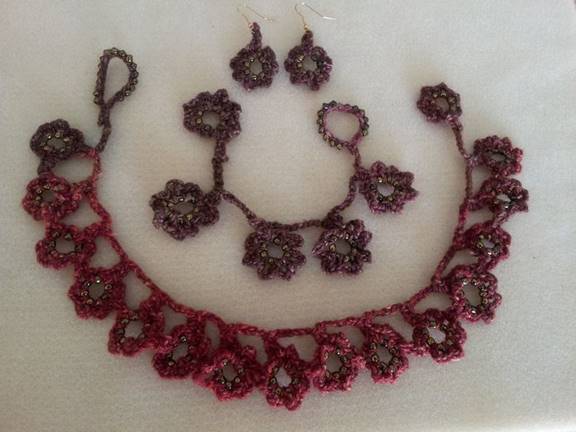
Use your judgment. New! I’ve been working on crochet
necklaces, incorporating beads, beadwoven wire
pieces, and DMC #5 embroidery yarns, especially the variegated ones. Here are some of the results:
This set is for me, and I
wear it a lot. It is based on the
"Soap Bubbles" pattern in The
Beaded Edge by Midori Nishida, from Interweave Press. There are two videos on YouTube that
demonstrate variations, here
and here. They are in Japanese, but that doesn't
matter, since the quality of video instruction is top notch - no words
necessary.
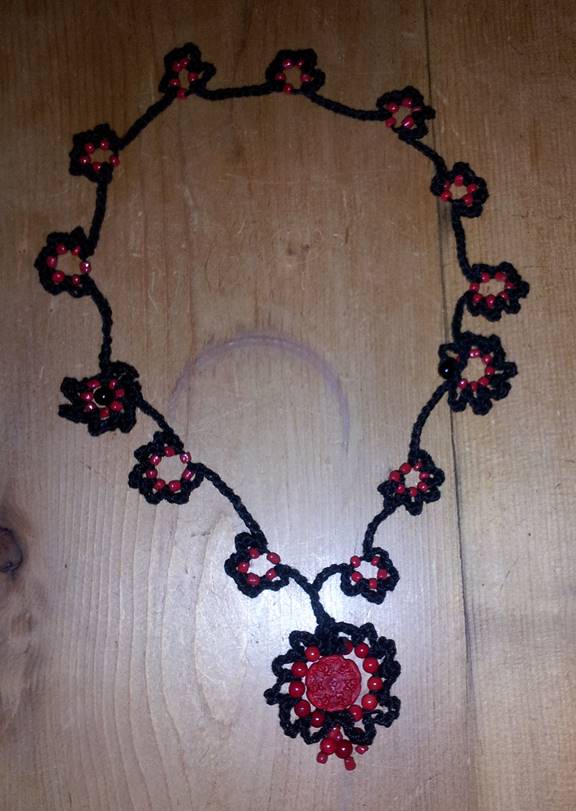
This one was made for a
Japanese friend. How did I guess she
would like black and red? The central
pendant has a large "carved Cinnabar" resin bead surrounded by
coral rounds, all wired with 28g black wire, then crocheted in with the same
black size 3 yarn as the rest of the necklace. The other beads are irregular glass ones in
a matching color. I love their
irregular shapes and the fact that their holes are very large, which is
convenient for sliding onto the yarn.
The necklace is long enough to fit over her head, but I did make a
similar one with a central pendant that doubles as the toggle. ---------- And then I began branching
out a lot more:
This one is for my
mother. It should go with lots of
things in her closet. It was a total
experiment, and loads of fun to come up with these strange new elements. The next one will be beach-themed, with
rich colors, for a friend who likes those. -----
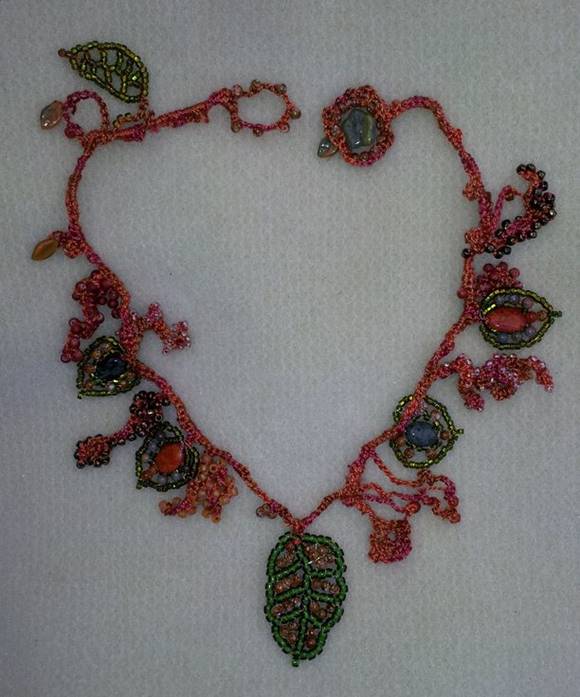
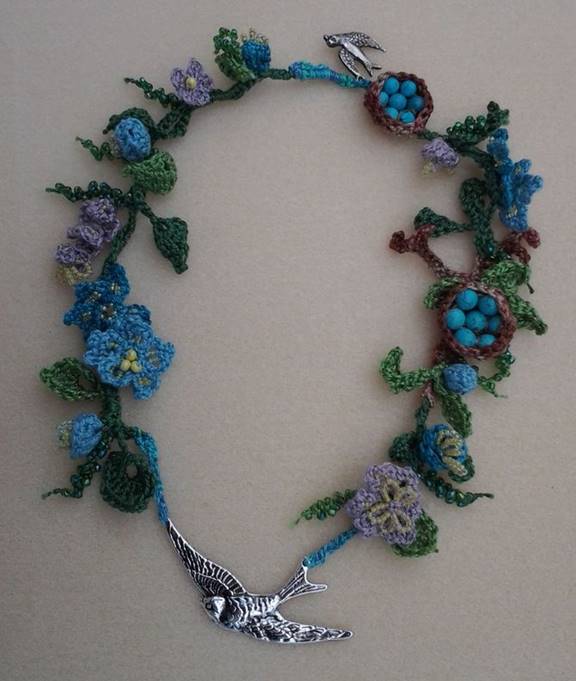
After the success of the
above, I went hog wild, making a this piece for my friend Hollie. It’s called “A Walk in the Woods”, which
explains its inspiration. When walking
in the woods, I tend to marvel at small things, and usually come out with a
little collection of interesting objects.
Hollie loves the woods, and I suspect she does the same thing. This one took a lot longer and it was much
harder to determine when it was finished.
There were so many colors to incorporate, and mixing them all required
layer upon layer of crochet in order to balance them. Also the central pendant took three tries
just to work out the logistics. It
required both crochet and wire to make the elements lie the way I wanted them
to.
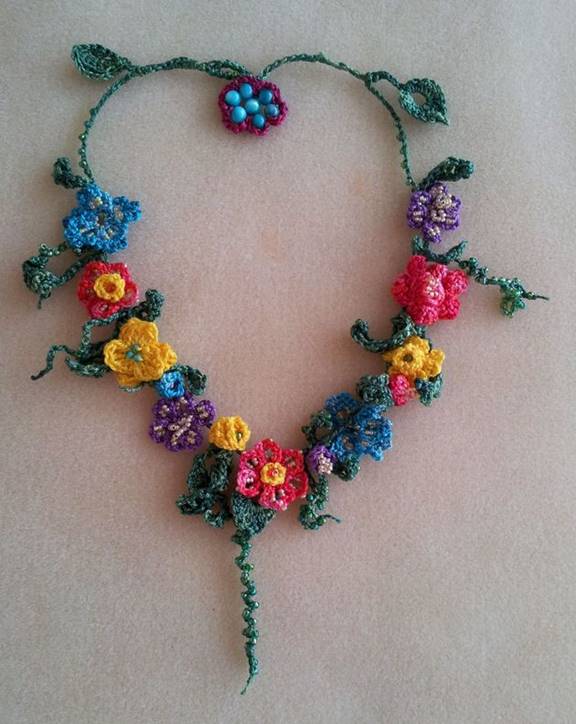
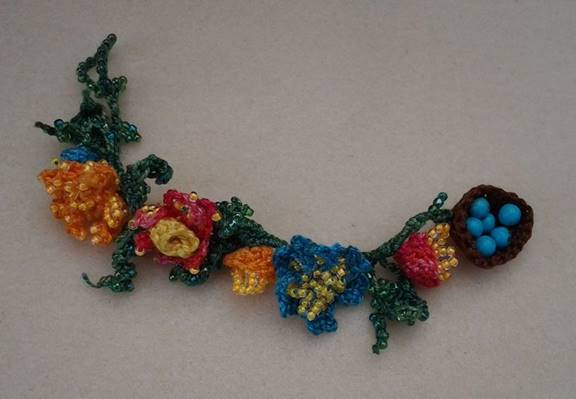
Then came a crocheted
garden for a friend who loves color. And a bracelet:
I finally developed a tutorial
for this type of piece, (click
here for a DOC and here
for a PDF) and the ones above and below. Basically, once one learns the technique,
the piece itself is limitless - any colors and shapes you wish can be
produced. The flowers are based on a
technique taught in The
Beaded Edge by Midori Nishida, which I highly recommend, as well as her The
Beaded Edge 2. I wired the toggle
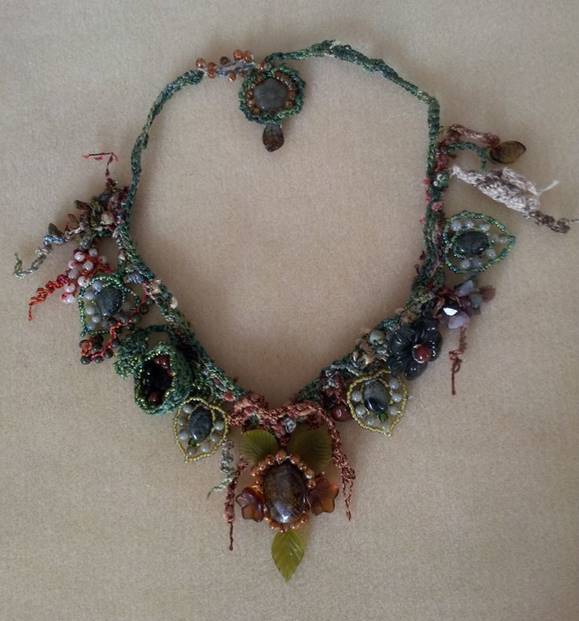
and crocheted around it in the same way as those on the two necklaces above. The cup in the "Walk
in the Woods" necklace gave me the idea to make a bird's nest as a
toggle, so I made the one below for another friend who likes these colors:
All of these necklaces are
put together using a freeform crochet technique of simply choosing yarns and
hooks and playing until the shapes are pleasing, then putting them all
together with a long strand, using single crochet and slip stitches, from one
end of the piece to the other. Then
for strength, I go back the other direction for a second layer of stitches. This also helps control the stretching a
bit, as all crochet will stretch. All
three necklaces were made mostly with DMC #5 pearl cotton, but "A Walk
in the Woods" has some other novelty yarns as well. Altogether, it has about eight different
yarns in it, all stitched with a #2 aluminum hook, as are all these pieces. Meanwhile, I've designed a
very detailed, very exciting undersea-themed one that will have some stuffed
elements in it. Can't wait to get
started! For more information on
freeform crochet, look back here in the next couple of months. Also see the International Freeform Crochet Group,
and type "freeform crochet" and/or "scrumbling"
in any search engine, then click the images tab. This is guaranteed to keep you occupied for
hours. Prepare to have your mind
blown! Some books I recommend on
the subject are: A new look at crochet by
Elyse Sommer The Crochet Workbook by
Sylvia Cosh & James Walters Freeform
Crochet and Beyond by Renate Kirkpatrick Freeform Style by Jonelle Raffino & Prudence Mapstone, and for that matter, anything else by
Prudence Mapstone, whose work is truly amazing. I also like Edie Eckman's books.
She uses great color combinations and has a whole book dedicated to
edging, called Around
the Border Crochet. Many of these
designs can be adapted for jewelry by using a small thread and hook. |
|
||||
|
How I Got into Beading I was taking up embroidery
again after several years. After seeing some needle working tools with
beaded fobs in a magazine, and looking at them "in person" at a
store and thinking "I could do that - it would look nicer and be cheaper
to boot," I set out to beautify some of the more utilitarian tools I
had. Below are the first results, which constitute my first forays into
the world of beading. At this point, I have beaded more than I have
embroidered! (Warning - this is an addictive and expensive hobby!)
|
||||||
|
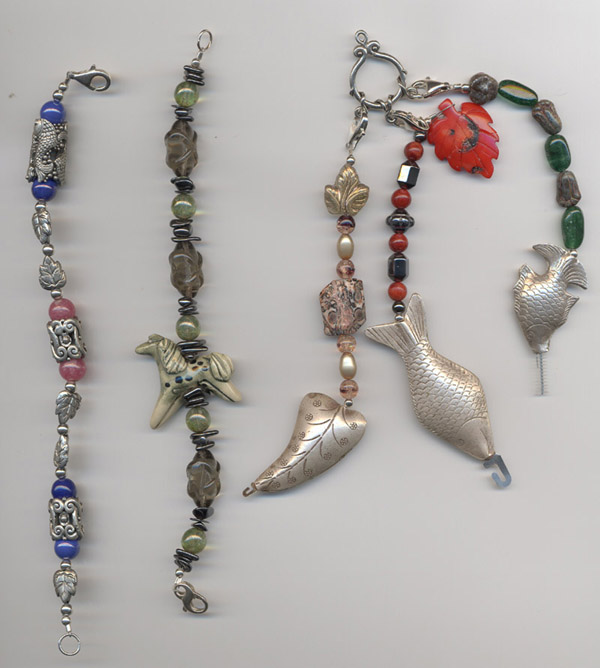
Embroidery tool fobs I
made. These could be made with cheaper materials, but I am only making one
set, and they should be as nice as possible. Working with lovely tools
makes the creative experience richer, and provides inspiration as well.
All my fobs are made with semiprecious stones, glass, and silver or
gold plated metal. The tools are the best quality as well, which means
they will last and be a joy to work with, not necessarily that they will cost
an arm and a leg. What's the point of creating pretty fobs for crummy
tools? |
||||||
|
|
||||||
|
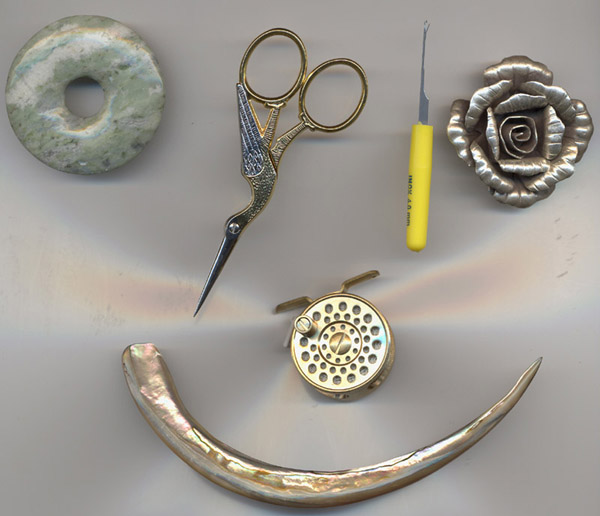
Embroidery tools needing
fobs. The seam presser (or donut, if you get one at a bead shop), stork
scissors (by Klaas), small latch hook, and abalone
stiletto came from Lacis. I also have a bone one
with a hole at the top (not shown). The abalone stiletto would need a sheath
which would attach to the yoke, since the shell may be too delicate to drill
and wire. The same will happen with the scissors (rather than attaching the
fob to the handle, which would interfere with using them). There is
also a seam ripper (not shown) that would need a sheath because it is flat
and sharp. I am thinking of making the sheaths of suede or leather and
embroidering them.
|
||||||
|
|
||||||
|
The fob in progress for the
measuring tape above. The white glass beads were handmade in |
||||||
|
|
||||||
|
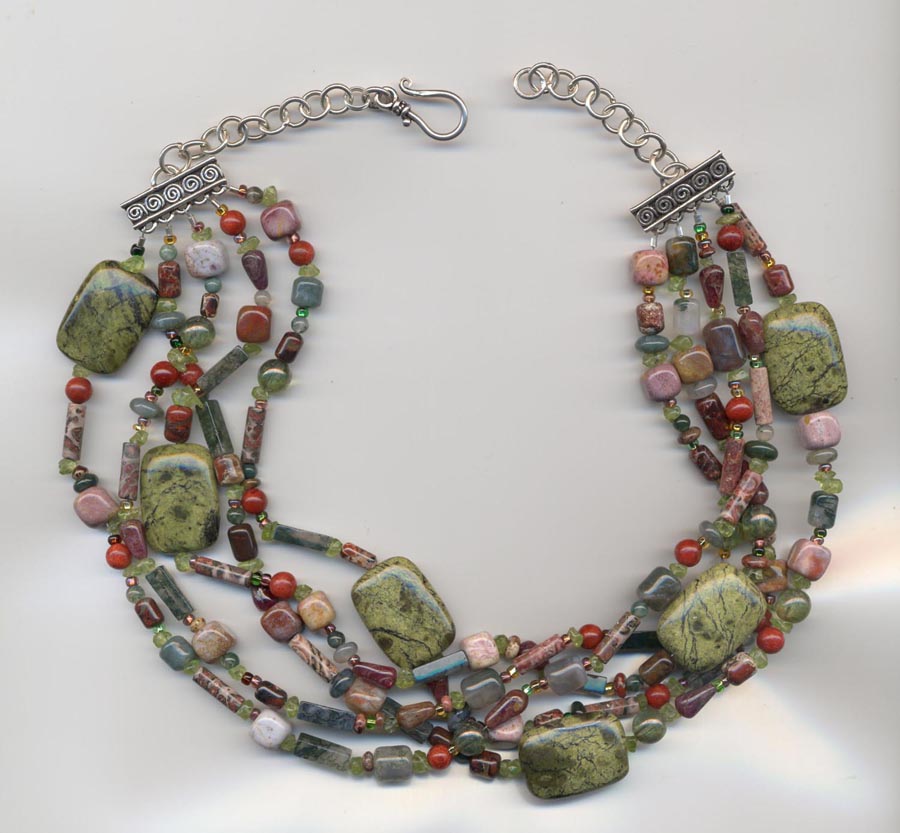
A necklace I made for my
Mom from beads I had bought for their beauty and had done nothing with.
Made with semiprecious stones, glass (only the smallest seed beads),
and silver. Strung on silver-colored beading wire. This is called a Bead Soup
necklace. Here is a tutorial
for making your own. Click
here for a DOC and here
for a PDF. |
||||||
|
|
||||||
|
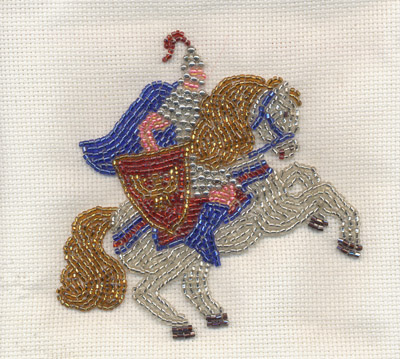
My beaded knight, made
years ago and intended as one side of a small purse. He is about
4" (10 cm) high and wide. Any suggestions as to what to do with
him? Maybe to make him a box top and bead the background part way up
from the bottom in greens for grass, and the rest up to the top with blues
for sky? A good friend has suggested
simply painting the background, and I think that's the best idea, but I still
don't know what to make him into. The next embroidery project
is a pair of beaded felt eyeglass cases with Art-Nouveau style images. One, already planned, will be poppies and
several kinds of insects. The other,
still nebulous, will be a lotus flower, frogs, and other aquatic creatures,
including more insects that you would find near the water. Can you tell I like bugs? They're such a fun subject, and they were
often featured in Art Nouveau designs. My dream project is a stumpwork tapestry, maybe 4' tall and 3' across, in a
Medieval style similar to the pictures in illuminated manuscripts. At the top will be a walled town with a
castle, and people all gathered outside the gate. Farther down, a pleasure garden with a
courting couple, a potager with gardeners, a field
with shepherd, sheep and wildflowers, and a forest with hunters, dogs, and
wild animals. It will be framed with
thick, stuffed embroidery, with flowers and leaves and animals entwined. The idea is that the more you look, the
more you will see. Yes, it's
ambitious, but I'll get to it someday.
|